While having a conversation on Twitter about Microsoft Graph API I was convinced that the traditional Exchange eDiscovery features were not available in the Microsoft Graph API. Boy was I wrong.
After stumbling across a few endpoints I had not seen previously, I decided to write a python package called graphish. Graphish is an open-source python package Swimlane is open-sourcing that will enable IT, security operations (SecOps), developers and others to search and delete email messages from mailboxes using the Microsoft Graph API.
If you are an Office 365 customer and have Microsoft Azure Active Directory, then you have all the necessary requirements to use this new package. But there are a few additional steps that must be taken before you can fully utilize this new package.
First, you must decide on the type of service/application you want to use when running this package. The Microsoft Graph API is accessible based on your organization registering an application with Microsoft Azure AD. This process can be complex, but luckily I already wrote a series to help you understand application types and using Microsoft Graph API:
- Microsoft’s OAuth2 endpoints and application types
- Microsoft’s OAuth2 implementation: Registering an app
- Microsoft’s OAuth2 implementation: Using Microsoft Graph API
Based on the application type, your authentication grant workflow will be different. Graphish supports both Legacy (delegated permissions) and Daemon/Service (application permissions) application registration types.
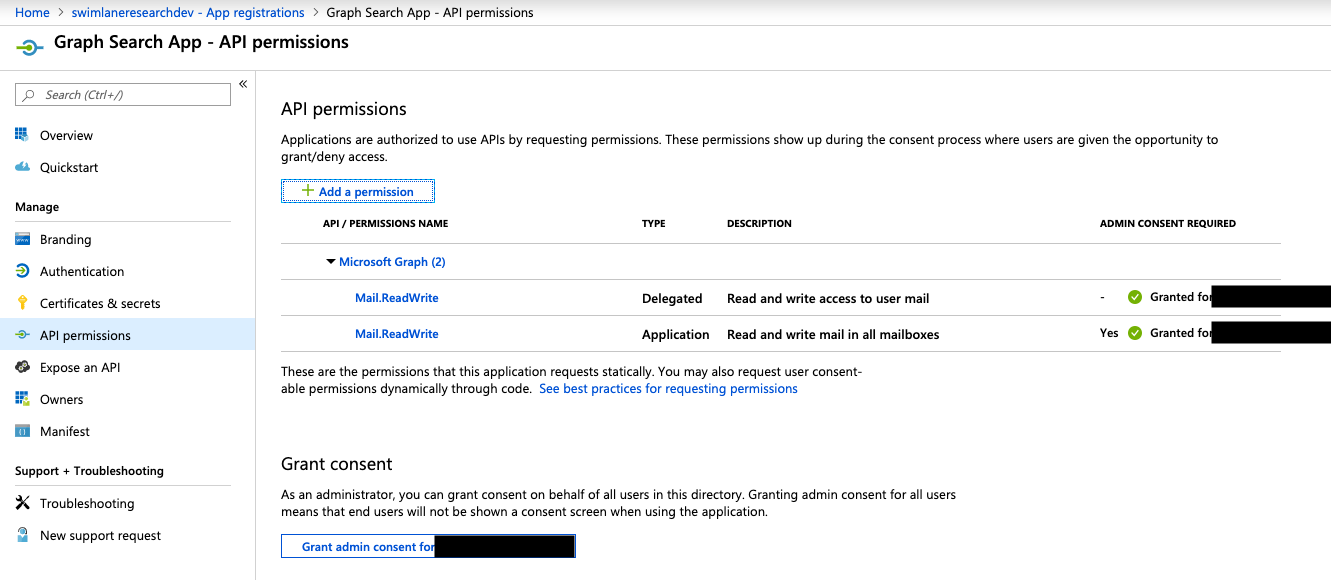
Here are the basics: If you want to use a username and password when accessing the Microsoft Graph API, you will need to make sure that you registered application has the appropriate permissions for the endpoint (with graphish that is Mail.ReadWrite) and the type is “Delegated”.
If you want to use graphish as a daemon/service application you will need to make sure that you have Mail.ReadWrite permissions with the type as “Application.”
The screenshot below shows both permissions—which is fine—but I recommend choosing one or over the other.

Once you have the application created in Azure Active Directory, now let’s go ahead and install graphish from pypi or our repository:
Locally
 git clone [email protected]:swimlane/graphish.git
 cd graphish
 pip install setup.py
OS X & Linux:
 pip install graphish
Windows:
 pip install graphish
Now that graphish is installed, we must provide the appropriate values based on which type of application you registered. In this example, I will show you how to use application (client credentials auth grant flow) authentication.
NOTE: More information on how to use graphish is located here.
To use graphish with application permissions you will need to supply the clientId, clientSecret, and tenantId to create a GraphConnector object.
from graphish import GraphConnector
# For backend / client_credential auth flow just supply the following
connector = GraphConnector(
 clientId='', # you applications clientId
 clientSecret='', # your applications
clientSecret
 tenantId='', # your applications Azure
Tenant ID
)
By using the application authentication (Client Credentials Grant Auth Flow) you can search your own mailbox (default) or if you pass a `userPrincipalName` then graphish will search that mailbox (e-mail address):
Searching your account using a service/daemon authentication flow:
from graphish import Search
search = Search(connector)
new_search = search.create(
 searchFolderName='Phishing Search',
 sourceFolder='inbox',
 filterQuery="contains(subject, 'EXPIRES')"
)
Searching another user’s mailbox using a service/daemon authentication flow:
from graphish import Search
search = Search(
 connector,
 userPrincipalName='[email protected]' # the user's mailbox
 you want to search
)
Once you have created a new search object, you can begin creating individual searches:
new_search = search.create(
 searchFolderName='Phishing Search2',
 sourceFolder='inbox',
 filterQuery="contains(subject, 'phish')"
 )
After creating our new search, including the name of our search folder (hidden), the source folder and our search terms, we can retrieve any findings by using the messages method:
messages = search.messages()
for message in messages:
 print(message)
Here is a list of the available properties on a message object:
- sentDateTime
- webLink
- conversationId
- internetMessageId
- id
- isReadReceiptRequested
- subject
- lastModifiedDateTime
- bodyPreview
- from
- isDraft
- connector
- importance
- changeKey
- receivedDateTime
- parentFolderId
- body
- isDeliveryReceiptRequested
- replyTo
- toRecipients
- ccRecipients
- flag
- user
- categories
- _headers
sender - createdDateTime
- isRead
- hasAttachments
- bccRecipients
- inferenceClassification
- @odata.etag
If we want to delete a message that was found during our search, we use the delete_search_messages method. If you wanted to delete another message then you would use the delete method.
To delete a message in our search folder, we must provide both the search folders ID as well as the message ID we want to delete.
# Delete a message
delete = Delete(
 connector,
 userPrincipalName='[email protected]', # the user's mailbox you
want to search
)
for message in messages:
 delete.delete_search_message(search.folderId, message.id)
There are a few other capabilities like updating and deleting searches, but you can find more information about those within our repository.
Happy Hunting!


